You may have accidentally erased your whole NAS drives or just been a victim of a software bug, but for a  reason or another your Iomega NAS may have lost his firmware.
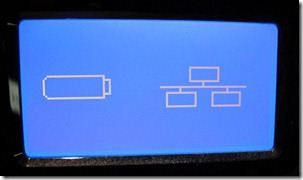
Front screen error
IX-Front-Screen-Error

On theses devices, the firmware is located on the installed drives, not in an integrated flash memory on the device, so if you lose your drives data, you may as well lose the OS.

This product being in EOL (End Of Lifecycle) it’s very difficult to find resources about how to install the firmware again, plus theses devices were shipped with the drives and firmware installed.

From what I’ve found online, you have to reach to Lenovo directly to get a recovery software/solution for the NAS, but there is also several other solutions.

Warning : This is going to recover your Iomega device in working condition, this will not recover your drives data. This method also seems to not work for everyone so be advised.

First we need some tools and firmware to recover the NAS :

Rodolfo & Braulio patched backup files

Older firmware backup : Mirror 1Mirror 2

First we need to prepare the drives, but with the recent updates, drives now needs to be initialised in GPT for larger capacity support, you also need to wipe them completely to erase any older partition data. To do that you can use your disk manager on MacOs, Windows and Linux.

Method 1 : Classic installation

Prepare your NAS, Remove every drives except the drives in the slot 1 and 2, they will be the targeted disks for the firmware install. Two disk are recommended to rebuild the raid group directly, but if the installation fails, you can try again with only one.

Make the bootable recovery USB, you first have to format your USB key to FAT 32, then extract the ix4-200d-recovery file to the USB support.

Install the firmware, Then, plug your USB key to the back, on the top USB port of the NAS. While pressing the NAS reset button, power on the NAS, keep holding for 60/70 seconds. The device will reboot. After the reboot logo showed up, you can release the reset button, watch for the hard drive blue activity light to see if you succeed.

Finish the installation, Wait for the firmware to do his business, it should take about 5 to 10 minutes, the unit should turn off and back up again, If it’s not turning on, start it manually. Keep the USB plugged until the usual interface shows up. Then shut it down, remove the USB drive and start it again !

You now should have a working NAS again ! Some updates may be available in the update tab as the firmware still not the most recent.

Method 2 : Physical installation

Follow the instructions of the instructions.txt file from the downloaded files (Specific hardware needed)

Mirror 1 Mirror 2

Special thanks to Rodolfo & Braulio for keeping upgrading this guide with their new patched firmware !
19 réponses

  1. Do you have recovery usb for cloud edition? my system was cloud and it has been without web access for 3 years. Now that I had a new system, I thought it was time to recover it. I recovered to non cloud with your usb, and drives do not work ok (probably not fully supported in non cloud).
    I cannot find recovery usb for cloud edition.
    Thanks a lot!!

  2. Hello !

    Thanks for your comment,
    From my experience, the drives should work with no problem with the cloud edition, I recovered several NAS with this guide (Cloud & non-cloud) and they all worked without problems. Try updating the firmware to a newer version if possible or check your drives !

    Keep me updated,
    Cloudkid

  3. Thanks a lot for answering. They are hitachi 3T. They should be at a correct firmware as they were working with latest cloud edition version. But now, system boots, starts reconfiguration of hard drives, but it finishes and disks are labeled as unusable. They can be used, but if I reboot, it will start check again (about 24 hours), and same thing happens. I cannot change to RAID 0 or anything.
    Screen capture can be seen in the post I entered in Lenovo forums:
    https://forums.lenovo.com/t5/Lenovo-Iomega-Networking-Storage-End-of-Life-Peer-to-Peer-Only/iomega-ix4-200d-cloud-edition-problem/m-p/5202933

    I am waiting for someone that might have a boot drive. Following this thread:
    https://blog.millard.org/2011/09/iomega-ix2-200-nas-non-cloud-to-cloud.html?sc=1675807468102#c296985762123164128
    I have created a ix4-boot.tgz from firmware 3.2.16.30221, but I am afraid to use it, as all feedback is negative (of course they are trying to convert from non CE to CE, but of course, it might be the boot usb that is bricking the boxes)
    Thanks again.

  4. I was able to install the latest cloud edition version with the usb I created, but it has the same problem that I originally had. Web access does not work, or it does not work correctly. The web server is actually listening, but I either get error of webpage not existing, or server error…
    I will try with an older firmware version, but I do not understand why this happens with latest version…
    Thanks for your help!

    1. Thanks for keeping me updated ! So what did you do specifically ? Can you provide me the firmware so I can extend the blog post ? I found that a lot of people are in the same situation. Glad you finally succeed !

    2. Would you share your solution? I’m stuck, because

      1 – I don’t find intermediate firmware versions that allow me to update to version ix4-200d-3.2.16.30221.

      2 – I couldn’t unzip the file with the recipe “openssl enc -d -aes-128-cbc -in ‘firmware.tgz’ -k ‘EMCNTGSOHO’ -out out.tgz”

  5. Once downloaded the old firmware for cloud edition, with the link I mentioned there is a procedure to make a boot tgz file from it.
    You can then introduce that file ix4-boot.tgz instead of the files.tgz file that is inside the recovery usb (in emctools/ix4-200d_images)
    The problem with all the firmware tgz files is that they are encrypted with password EMCNTGSOHO, but in a linux box or with a running ix4 you can extract the files and create the bootable firmware. If you have a place on your webpage, or email, I can send you the successful ix4-boot.tgz file for ix4-200d-3.2.14.30167.tgz. This one works perfectly for me, and anyone could then upgrade to latest firmware if they wish. In my case, latest will make me lose web access (I honestly ignore why), but that is not probably the case for most people.

  6. I finally got it! I followed Rodolfo’s instructions, and managed to get my ix4-200d working again with the updates.

    Some lessons:

    – The drives must be zeroed before the procedure. Putting it on a linux and running a “wipefs” or even a “dd” to ensure they don’t contain partition information is important to success;

    – Drives are now no longer partitioned in DOS mode, but GPT. This means that larger drives (4tb in my case) are accepted;

    – Sometimes the reset procedure has to be repeated. I don’t understand why, but sometimes when loading the OS, it stops at 50%. Just run the reset again, which works (at least for me).

    After resetting, it can be updated to the latest version ix4-200d-3.2.16.30221 without any problems.

    Here’s the download link for your recover drive, with the files.tgz file replaced by the ix4-boot.tgz created by the tips given by Rodolfo (thanks!) in his post. https://1drv.ms/u/s!AldpEDPKMJN9kuQwcjpJIviVphg2hA?e=UXFd0S

  7. Thanks for uploading, I was looking where to upload file as I have issues with a full google drive…
    I am happy that it was helpful!

    1. I’m just happy to contribute. Your website has been a reference to all of Iomega’s orphans. I hope there will be feedback, positive or otherwise, to let us know if we could help others.

  8. Hello everyone,
    I still have issues getting my Iomega to work (even after I read the comments and followed the steps there).. I have followed these steps:
    – Formatted the USB stick to FAT32
    – Extracted the “ix4-200d-recovery” file on the stick
    – Put in 2 completely zeroed drives in slot 1 and 2
    – Plugged the USB stick in the USB slot (top)
    – Pressed down the reset button and powered the NAS on
    – Hold it for 60-70 seconds

    I have attempted the procedure 20 times so far and only once did a progress bar appear which completed at 100%. However the NAS then kept restarting and I was unable to stop it from being stuck in a restart loop for 20 minutes. Eventually I had to turn off the system to stop the loop. When I turned the system back on, the “USB and network” symbol still appeared, so I redid the entire procedure. Despite many many attempts I was unable to get the progress bar to appear again. I am exhausted and unsure of what to do next. If anyone has any suggestions, please let me know…

    1. Hello !

      Some questions concerning the drives, did you properly formatted them like braulio did (Complete wipe and partition deletion) ?

      Also did you initialised them in GPT ?

      Regards, Cloudkid

  9. Hello,
    I’ve found this page hard googling!
    I’ve a question, can i use « ix4-200d-recovery » to upgrade my Ix4-200D from not cloud to Cloud Version
    in case I can perform also a disks upgrade, with more large disks.

    thanks in advance
    Angel

    1. Hi !

      Yes i’m currently rebuilding my website, Google indexing may be out of touch.
      You should be able to, that’s what I did so you should not have any problems !
      The bigger disks does not cause any problem just remember to initialise them in GPT.

      Regards, Cloudkid

      1. HI there
        I have a ix4-200d cloud box which had a crash!
        I have tried this procedure with the original USB stick process as listed on this page.

        I have sucess in restoring the unit to the non-cloud 2.1 firmware and it boots. i am unable to upgrade the firmware to the 3.xx as it wont let me.

        I have tried restoring the box with the 3.xx software in place of the files.tgz file but it does not work!
        Are there any other changes that need to be made to the USB stick apart from chnging the firmware files?

        Seems strange that it works on the 2.xx but will not work on the 3.xx versions?

        Any help would be great. Thanks to all the users here

  10. The web access issue is completely about language, I tried several times which this page described. Thank you all, I appreciated that. On the third time I selected English language on the edge internet browser. I have reached web access directly. Still on the other internet browsers I am still having same error right now because I am using Turkish on them.

Répondre à Braulio Annuler la réponse

Votre adresse e-mail ne sera pas publiée. Les champs obligatoires sont indiqués avec *